首页
|
新闻
|
新品
|
文库
|
方案
|
视频
|
下载
|
商城
|
开发板
|
数据中心
|
座谈新版
|
培训
|
工具
|
博客
|
论坛
|
百科
|
GEC
|
活动
|
主题月
|
电子展
注册
登录
论坛
博客
搜索
帮助
导航
默认风格
uchome
discuz6
GreenM
»
MCU 单片机技术
» 【代码】android自定义控件实例
返回列表
回复
发帖
发新话题
发布投票
发布悬赏
发布辩论
发布活动
发布视频
发布商品
【代码】android自定义控件实例
发短消息
加为好友
我是MT
当前离线
UID
1023166
帖子
6651
精华
0
积分
3328
阅读权限
90
来自
燕山大学
在线时间
230 小时
注册时间
2013-12-19
最后登录
2016-1-5
论坛元老
UID
1023166
性别
男
来自
燕山大学
1
#
打印
字体大小:
t
T
我是MT
发表于 2014-10-26 09:52
|
只看该作者
【代码】android自定义控件实例
android
很多时候android常用的控件不能满足我们的需求,那么我们就需要自定义一个控件了。今天做了一个自定义控件的实例,来分享下。
(PS:新建的QQ群,有兴趣可以加入一起讨论:
Android
学习交流群
:
278744577
,验证:
eec
)
首先定义一个layout实现按钮内部布局:
源码打印?
android:layout_width="fill_parent"
android:layout_height="fill_parent"
android
rientation="horizontal" >
android:id="@+id/imageView1"
android:layout_width="wrap_content"
android:layout_height="wrap_content"
android:layout_gravity="center_vertical"
android:paddingBottom="5dip"
android:paddingLeft="40dip"
android:paddingTop="5dip"
android:src="@drawable/right_icon" />
android:id="@+id/textView1"
android:layout_width="wrap_content"
android:layout_height="wrap_content"
android:layout_gravity="center_vertical"
android:layout_marginLeft="8dip"
android:text="确定"
android:textColor="#000000" />
复制代码
接下来写一个类继承
Linear
Layout,导入刚刚的布局,并且设置需要的方法,从而使的能在代码中控制这个自定义控件内容的显示。
源码打印?
public class ImageBtn extends LinearLayout {
private ImageView imageView;
private TextView textView;
public ImageBtn(Context context) {
super(context);
// TODO Auto-generated constructor stub
}
public ImageBtn(Context context, AttributeSet attrs) {
super(context, attrs);
// TODO Auto-generated constructor stub
LayoutInflater inflater=(LayoutInflater) context.getSystemService(Context.LAYOUT_INFLATER_SERVICE);
inflater.inflate(R.layout.imagebtn, this);
imageView=(ImageView) findViewById(R.id.imageView1);
textView=(TextView)findViewById(R.id.textView1);
}
/**
* 设置图片资源
*/
public void setImageResource(int resId) {
imageView.setImageResource(resId);
}
/**
* 设置显示的文字
*/
public void setTextViewText(String text) {
textView.setText(text);
}
}
复制代码
在需要使用这个自定义控件的layout中加入这控件,只需要在xml中加入即可。
源码打印?
android:layout_width="fill_parent"
android:layout_height="fill_parent"
android
rientation="horizontal" >
android:id="@+id/btn_right"
android:layout_height="wrap_content"
android:layout_width="wrap_content"
android:background="@drawable/btn"
/>
android:id="@+id/btn_error"
android:layout_marginLeft="5dp"
android:layout_height="wrap_content"
android:layout_width="wrap_content"
android:background="@drawable/btn"
/>
复制代码
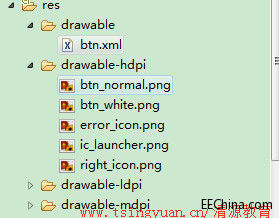
这里用到了背景图片 在drawable/btn.xml
源码打印?
\
最后在activity中设置该控件,和其他控件差不多:
源码打印?
public class IdentifyButtonActivity extends Activity {
private ImageBtn imageBtn1;
private ImageBtn imageBtn2;
@Override
protected void onCreate(Bundle savedInstanceState) {
// TODO Auto-generated method stub
super.onCreate(savedInstanceState);
setContentView(R.layout.identifybutton);
imageBtn1=(ImageBtn) this.findViewById(R.id.btn_right);
imageBtn2=(ImageBtn) this.findViewById(R.id.btn_error);
imageBtn1.setTextViewText("确定");
imageBtn2.setTextViewText("取消");
imageBtn1.setImageResource(R.drawable.right_icon);
imageBtn2.setImageResource(R.drawable.error_icon);
imageBtn1.setOnClickListener(new View.OnClickListener() {
public void onClick(View v) {
// TODO Auto-generated method stub
Toast.makeText(getApplicationContext(), "点击的正确按钮", 1).show();
}
});
imageBtn2.setOnClickListener(new View.OnClickListener() {
public void onClick(View v) {
// TODO Auto-generated method stub
Toast.makeText(getApplicationContext(), "点击的错误按钮", 1).show();
}
});
}
}
复制代码
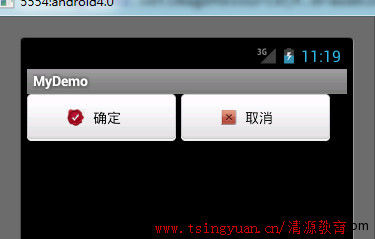
最后看看我们自定义控件的效果吧!
\
点击后还有按下按钮的效果。
收藏
分享
评分
回复
引用
订阅
TOP
返回列表
PowerPC
模拟电路
电商论坛
Pine A64
资料下载
方案分享
FAQ
行业应用
消费电子
便携式设备
医疗电子
汽车电子
工业控制
热门技术
智能可穿戴
3D打印
智能家居
综合设计
示波器技术
存储器
电子制造
计算机和外设
软件开发
分立器件
传感器技术
无源元件
资料共享
PCB综合技术
综合技术交流
EDA
MCU 单片机技术
ST MCU
Freescale MCU
NXP MCU
新唐 MCU
MIPS
X86
ARM
PowerPC
DSP技术
嵌入式技术
FPGA/CPLD可编程逻辑
模拟电路
数字电路
富士通半导体FRAM 铁电存储器“免费样片”使用心得
电源与功率管理
LED技术
测试测量
通信技术
3G
无线技术
微波在线
综合交流区
职场驿站
活动专区
在线座谈交流区
紧缺人才培训课程交流区
意见和建议


 rientation="horizontal" >