|

- UID
- 1023229
- 来自
- 中国
|

step1:使用creat_project指令创建一个项目设计,产生这个项目的目录,以及有关的子目录。
具体使用的指令是create_project tcl_first //这里的tcl_first是你的项目名称。
在你建好的项目中,有.xpr,.data,.srcs和.runs的目录。其中.xpr和.data保存着全部项目管理的信息和状态。在.srcs目录下的就是源文件:RTL(verilog,VHDL,system verilog);IP核(利用import_file指令将文件放到Source_1的目录下,或者add File);约束文件集在constrs_1:包含设计所需的全部约束文件(时序约束和物理约束);仿真文件:testbench和测试案例。使用get_filesets指令可以找到文件集,利用get_files指令可以找到文件。
step2:项目运行管理器:输出文件的位置:DIRECTORY。
利用的工具:FLOW。
综合运行:XST可以作为综合工具。
运行之后可以在TCL看要求的特性:get_property。
以上是一些可能用到的指令。
利用creat_run指令产生运行,synth_1和impl_1的运行是自动产生的。
利用set_property设置运行对象的特性来配置运行。利用launch_runs指令启动运行,利用-next_step或-to_step选项可以控制哪个步骤运行。
利用-pre_launch_script指令和-post_launch_script选项可以在进程进行之前或之后运行Tcl脚本。
利用reset_runs指令可以进行复位运行。
利用wait_on_run指令主要的vivado设计套件的进程可以等待一个运行完成。
使用open_design可以看你的设计!
step3:约束管理: 当使用launch_runs的时候启动一个进程,后台在开始之前读入约束。在交互模式下,约束存放在存储器中,可以利用report_time和report_summmary产生时序报告。
step4:进入实战,了解了这么多概念,接下来试试利用基于项目的设计流程通过产生设计项目,添加源文件,设置项目变量进行进程特性和实现设计项目四个步骤实现wavegen项目。
利用Tcl 修改Tcl文件 在指定位置添加Tcl命令
产生设计项目 DO_build.tcl #source $script_dir / create_proj.tcl
create_proj.tcl create_project wave_gen -part $device
set_property target_language Verilog [current_project]
添加源文件 Do_build.tcl #source_files $script_dir/load_files.tcl
Load_files.tcl import_files [glob $src_dir / *]
import_files -fileset [get_fileset constrs_1] $xdc_dir / wave_gen_timing.xdc
get_timing.xdc
设置项目变量 Do_build.tcl "#source $ script_dir/set_props.tcl"
进行进程特征 Set_props.tcl set_property steps.synth_design. args. flatten_hierarchy full [get_runs synth_1]
实现设计项目 Do_build.tcl "#source $ script_dir/implement.tcl"
Implement.tcl wait_on_run synth_1
Do_build.tcl文件:
# This script will form the basis of a repeatable, scripted build process
# that can be used to generate complete projects.
#
# While completely scripted, the end result is an Vivado project that can be
# viewed and even manipulated by the Vivado IDE.
#
# This script will
# - Create a new directory for the build
# - the name will be build_YYMMDD_HHMMSS where YYMMDD_HHMMSS is the
# current time
# - Change directory into that directory
# - Create a new Vivado project
# - Set the main project properties for the target device
# - Load all the # source files
# - Set appropriate process properties
# - Implement the design
#
# Get the current date/time. The result is a machine readable version of the
# the date/time (number of seconds since the epoch started)
set time_raw [clock seconds];
# Format the raw time to a date string
set date_string [clock format $time_raw -format "%y%m%d_%H%M%S"]
# Set the directory name to be build_YYMMDD_HHMMSS
set proj_dir "build_$date_string"
# Create the new build directory
puts "Creating build directory $proj_dir"
file mkdir $proj_dir
# The remaining TCL scripts live in this directory. Remember
# the path before we change directories
set script_dir [pwd]
set src_dir [pwd]/wave_gen/src
set core_dir [pwd]/wave_gen/cores
set xdc_dir [pwd]/wave_gen/constraints
# Change directories to the new build directory
puts "Changing directory to $proj_dir"
cd $proj_dir
# Source the script that will create the new project
source $script_dir/create_proj.tcl
# Source the script that will imports all the files required for the build
source $script_dir/load_files.tcl
# Source the script that will set all the process properties necessary
source $script_dir/set_props.tcl
# Source the script that will regenerate the cores and run the implementation
# process
source $script_dir/implement.tcl
以上是Tcl的模板,根据上面step4的要求对这个进行修改。
》在命令行中找到你装的vivado的当前目录:比如-> cd D:\Xilinx\Vivado\2014.2
》接着输入64位的 OS用户,输入.settings64.bat
》接着到你的tcl的目录下,在命令行输入:vivado - mode tcl -source do_build.tcl(若发现错误,那就再运行一次)
》如果成功,你就可以看到:

我这里看到有以下的warning:
好像说的是有新版本。
》在vivado后面输入start_gui。
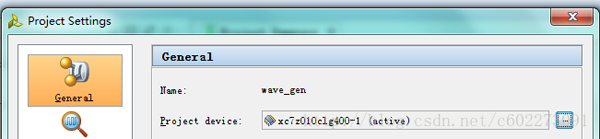
》看看Project Setting那里选的板子有没有错误。然后在Tcl Console那里输入stop_gui。在命令行那里输入exit。
对于create_proj.tcl的修改:以下tcl是用来选板子型号和源文件的语言。我的板子是zynq-7000,所以就把下面的device那里修改了一下!这个tcl完成的是项目的创建工作!
# This script sets the project variables for the Kintex7 device
# assign part to device variable
set device xc7k70tfbg484-2
# Create the project
puts "Creating new project: wave_gen"
# Insert the command to create the project here
create_project wave_gen -part $device
# Insert the command to set the target language for the project here
set_property target_language Verilog [current_project]
修改完保存退出,然后在命令行执行do_build.tcl,接着打开vivado的gui看到板子的型号已经改了。
对于load_files.tcl,这个是用来添加源文件的tcl。
import_files [glob $src_dir/*]
这个把RTL加了进去。
import_files -fileset [get_filesets constrs_1] $xdc_dir/wave_gen_timing.xdc
这个把约束加了进去。
import_ip -files $core_dir/char_fifo.xci -name char_fifo
加入了IP核,这里会有warning的话就根据给的提示,去vivado那里看看版本问题。
create_ip -name clk_wiz -version 5.1 -vendor xilinx.com -library ip -module_name clk_core
这个是增加了时钟。
具体代码如下:
# This script loads all the files required by the project
puts "Adding RTL files to the project"
# Insert the command to import the RTL files form $src_dir here
import_files [glob $src_dir/*]
puts "Importing XDC file to the project"
# Insert the command to import the XDC file form $xdc_dir here
import_files -fileset [get_filesets constrs_1] $xdc_dir/wave_gen_timing.xdc
puts "Importing Char_fifo IP to the project"
import_ip -files $core_dir/char_fifo.xci -name char_fifo
puts "Adding clk_core IP to the project"
create_ip -name clk_wiz -version 5.1 -vendor xilinx.com -library ip -module_name clk_core
set_property -dict [list CONFIG.Component_Name {clk_core} CONFIG.PRIM_SOURCE {Differential_clock_capable_pin} CONFIG.PRIM_IN_FREQ {200.000} CONFIG.CLKOUT2_USED {true} CONFIG.CLKOUT1_REQUESTED_OUT_FREQ {200.000} CONFIG.CLKOUT2_REQUESTED_OUT_FREQ {193.750}] [get_ips clk_core]
对于配置文件,set_props修改如下:
# This script overrides some process properties. Only those that need to be set
# differently from the defaults will be set here
puts "Setting Synthesis and Implementation properties"
puts "Setting Flatten Hierarchy property for synth_1 run"
# Insert a command to change flatten_hierarchy property to full
set_property steps.synth_design.args.flatten_hierarchy full [get_runs synth_1]
puts "Enable power optimization for impl_1 run"
set_property steps.power_opt_design.is_enabled true [get_runs impl_1]
最后是实现设计项目:
implement.tcl:
# Synthesize and Implement the design
puts "synthesizing the design"
# Insert the command to launch synthesis run here
launch_runs synth_1
puts "wait until synthesis done"
# Insert the command to wait on synth_1 run here
wait_on_run synth_1
puts "Implementing the design"
launch_runs impl_1
puts "wait until Implementation done"
wait_on_run impl_1 |
|


